How to Download RL Sideswipe on PC
Posted 21st July 2021 by FinRL
About two months ago I created a video tutorial on YouTube for downloading the game on PC using Bluestacks 4. I said in this video that it's unfortunate we can't yet run the game on Bluestacks 5, but that changed this morning. With a new early access version of Bluestacks 5.2, the required features were added for this to be possible, and that's exactly what I'm about to explain to you how to do!
This tutorial was made for Windows, however I see no reason why it wouldn't also work for Mac OS. I am not able to verify this, but to the best of my knowledge it should still work fine.
Step 1: Download Bluestacks 5.2
Click here to download the early access version of Bluestacks 5.2. If you are reading this a few weeks after it was posted, there is probably a good chance the version you can download directly from the Bluestacks home page will work as well.
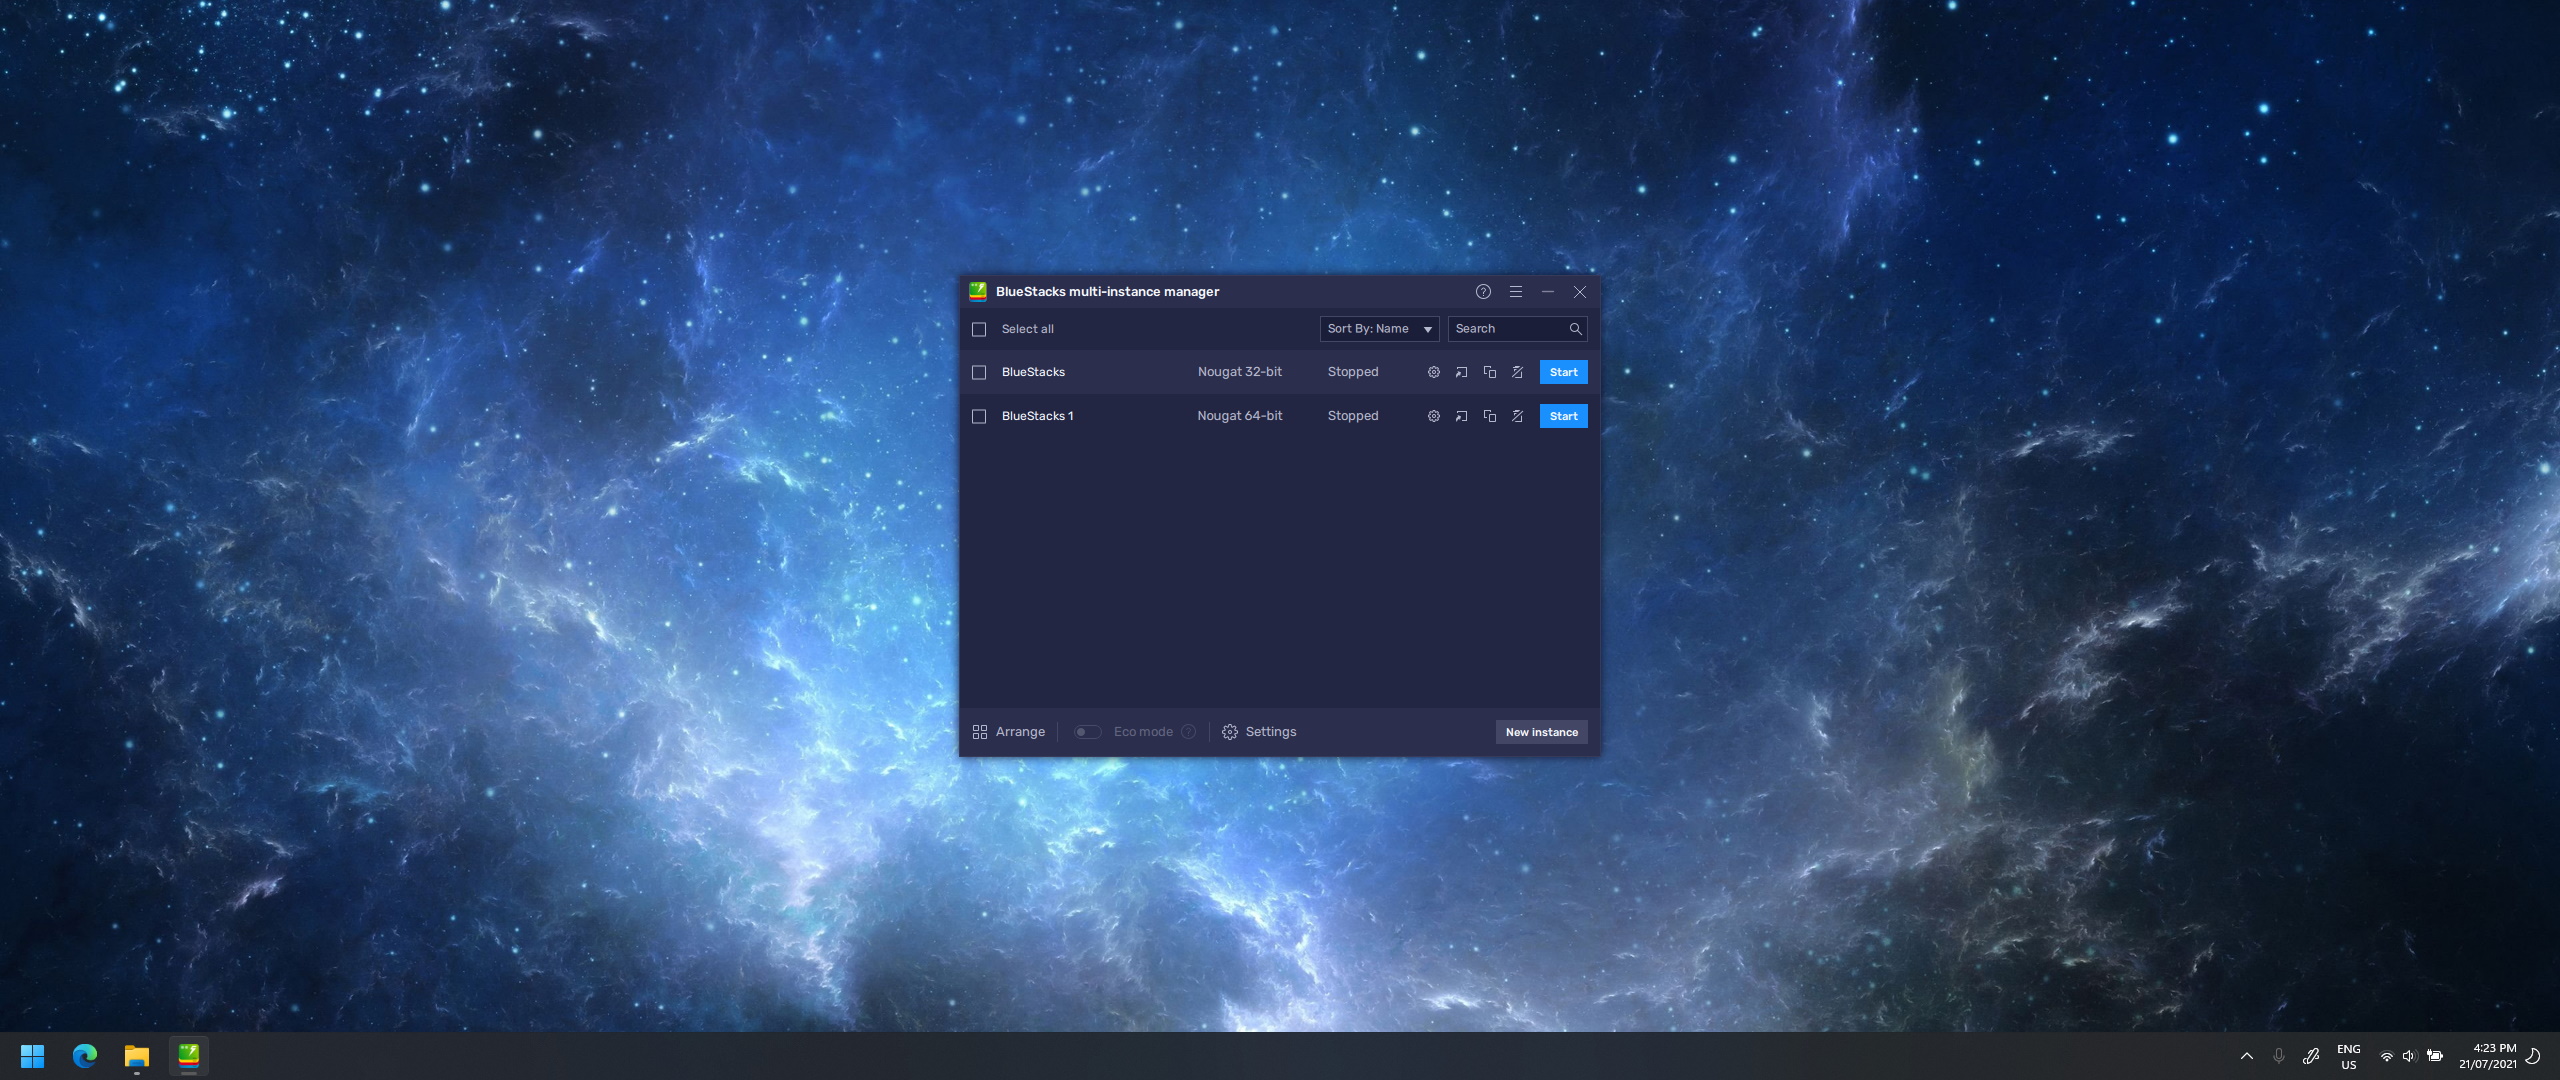
Run the installer and it will take you through the steps for installation. In my case I didn't change anything during this process, but you can if you would prefer. Once that's installed, it'll open up the program and you should see something like this:
Step 2: Setup Bluestacks for RLSS
Out of the box, Bluestacks will not be able to run RL Sideswipe, as there are several changes that need to be made in settings for it to work. Before doing anything else, you will need to create a 64-bit instance of Bluestacks.
Setting up a 64-bit Instance
By default, the installer will setup a Nougat 32-bit instance of Bluestacks, which cannot install the game. If you skipped this step you would reach the last part of the installation process and it would not allow you to finish as you wouldn't have the right architecture for it. To setup a 64-bit instance, follow these steps:
- Click on Multi-instance manager. Its the second-last icon on the right side of the screen.
- Click New Instance in the bottom right corner of the popup.
- Choose Fresh Instance.
- Select Nougat 64-bit from the dropdown.
- Click Next, and finally Download.
Downloading will take some time, so just wait a couple minutes and it should finish. The 32-bit instance of Bluestacks can be closed as it isn't needed anymore, but make sure to keep the instance manager open. Once the download finishes, you can click Start on Bluestacks 1 which should list itself as a Nougat 64-bit instance. You can double check this by making sure the top right of the program says N64 and not N32.
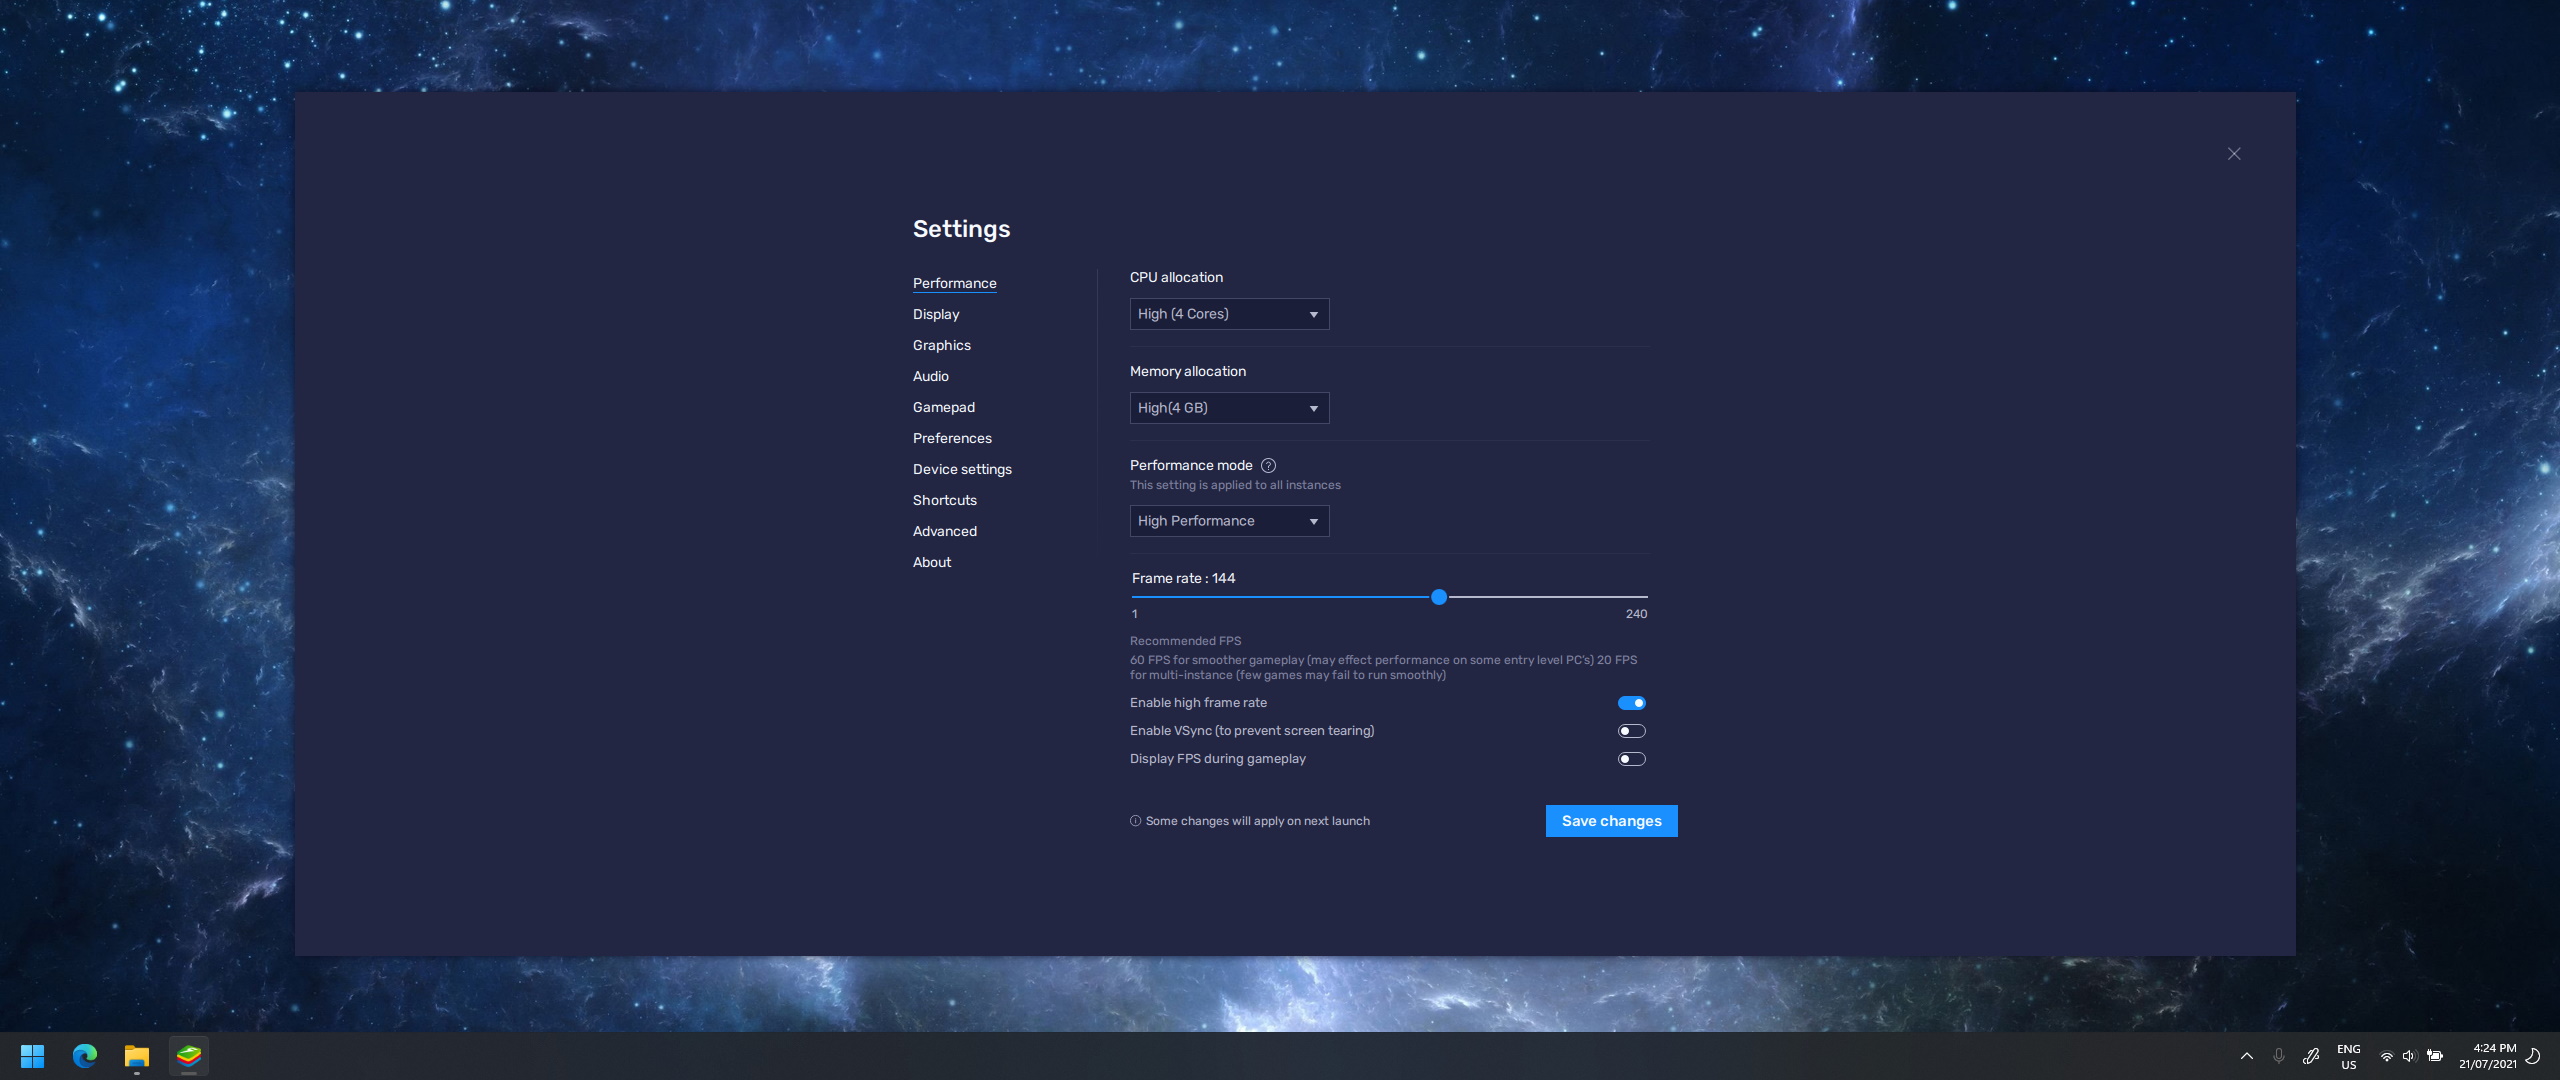
By clicking on the settings button in the bottom right of the program, you will need to match your settings to the following (sorted into their categories as in Bluestacks):
Performance
- CPU Allocation: High (4 cores)
- Memory Allocation: High (4 GB)
- Performance Mode: High Performance
If you have a high refresh rate monitor, you can also enable high frame rate and set it to whatever you have, however the game is capped at 60 fps so it won't make much difference for RL Sideswipe (unfortunately!). When you try to save changes for this (and graphics settings later as well) you will need to restart Bluestacks, but it will do it for you. You'll just need to re-open the settings again to continue.
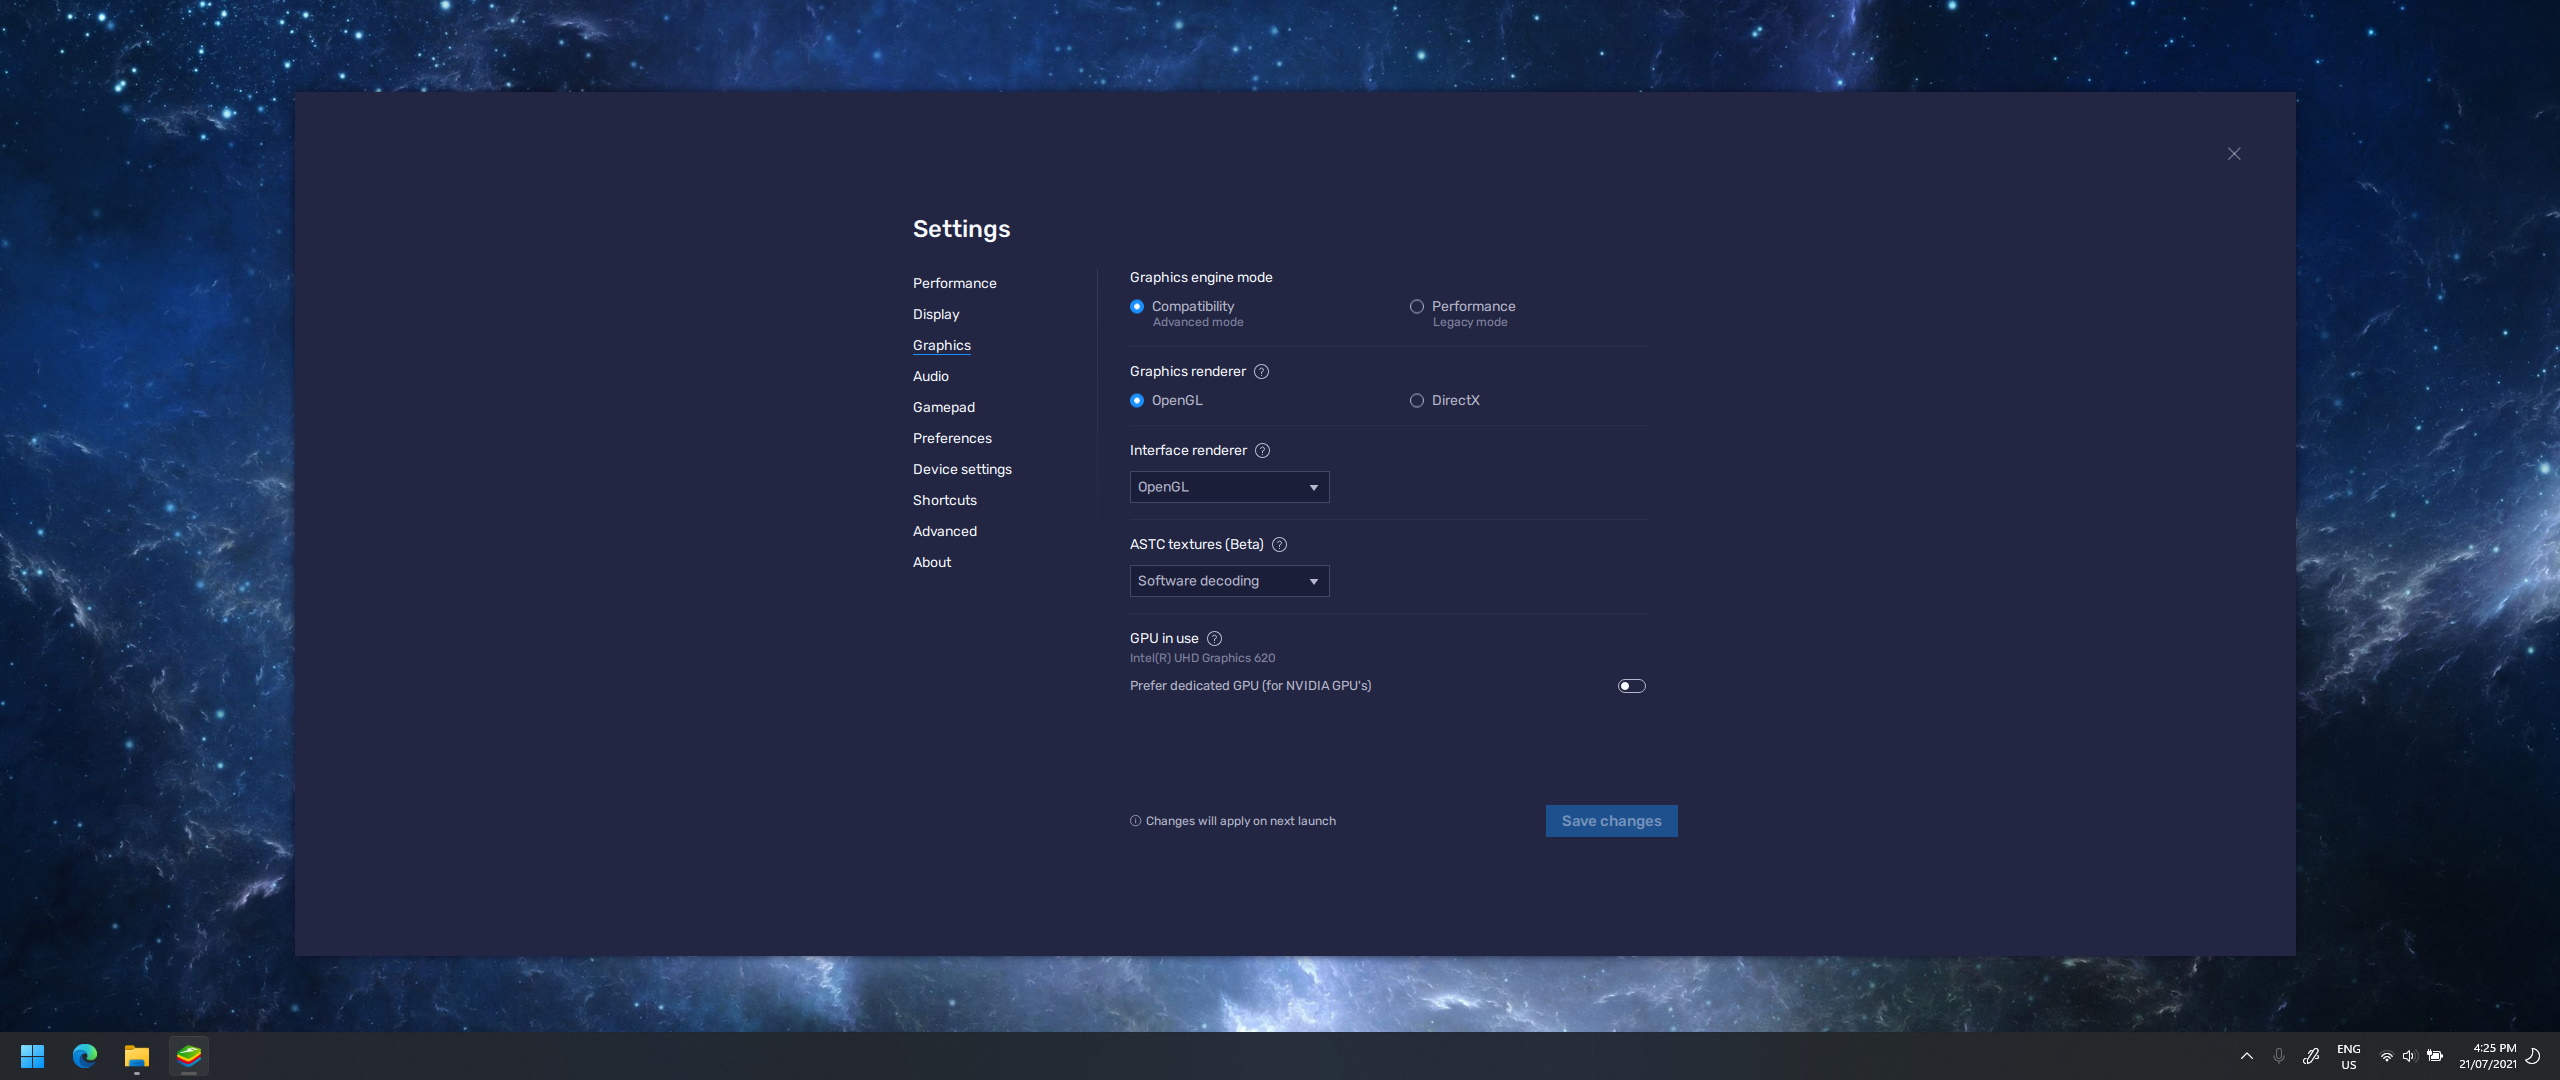
Graphics
- Graphics engine mode: Compatibility (Advanced mode)
- Graphics renderer: OpenGL
- Interface renderer: OpenGL
- ASTC textures: Software decoding
- Prefer dedicated GPU: Off
These settings are essential for getting the game to run. While the performance settings aren't required, they are highly recommended, but without these settings done in this way, the game straight up will not work.
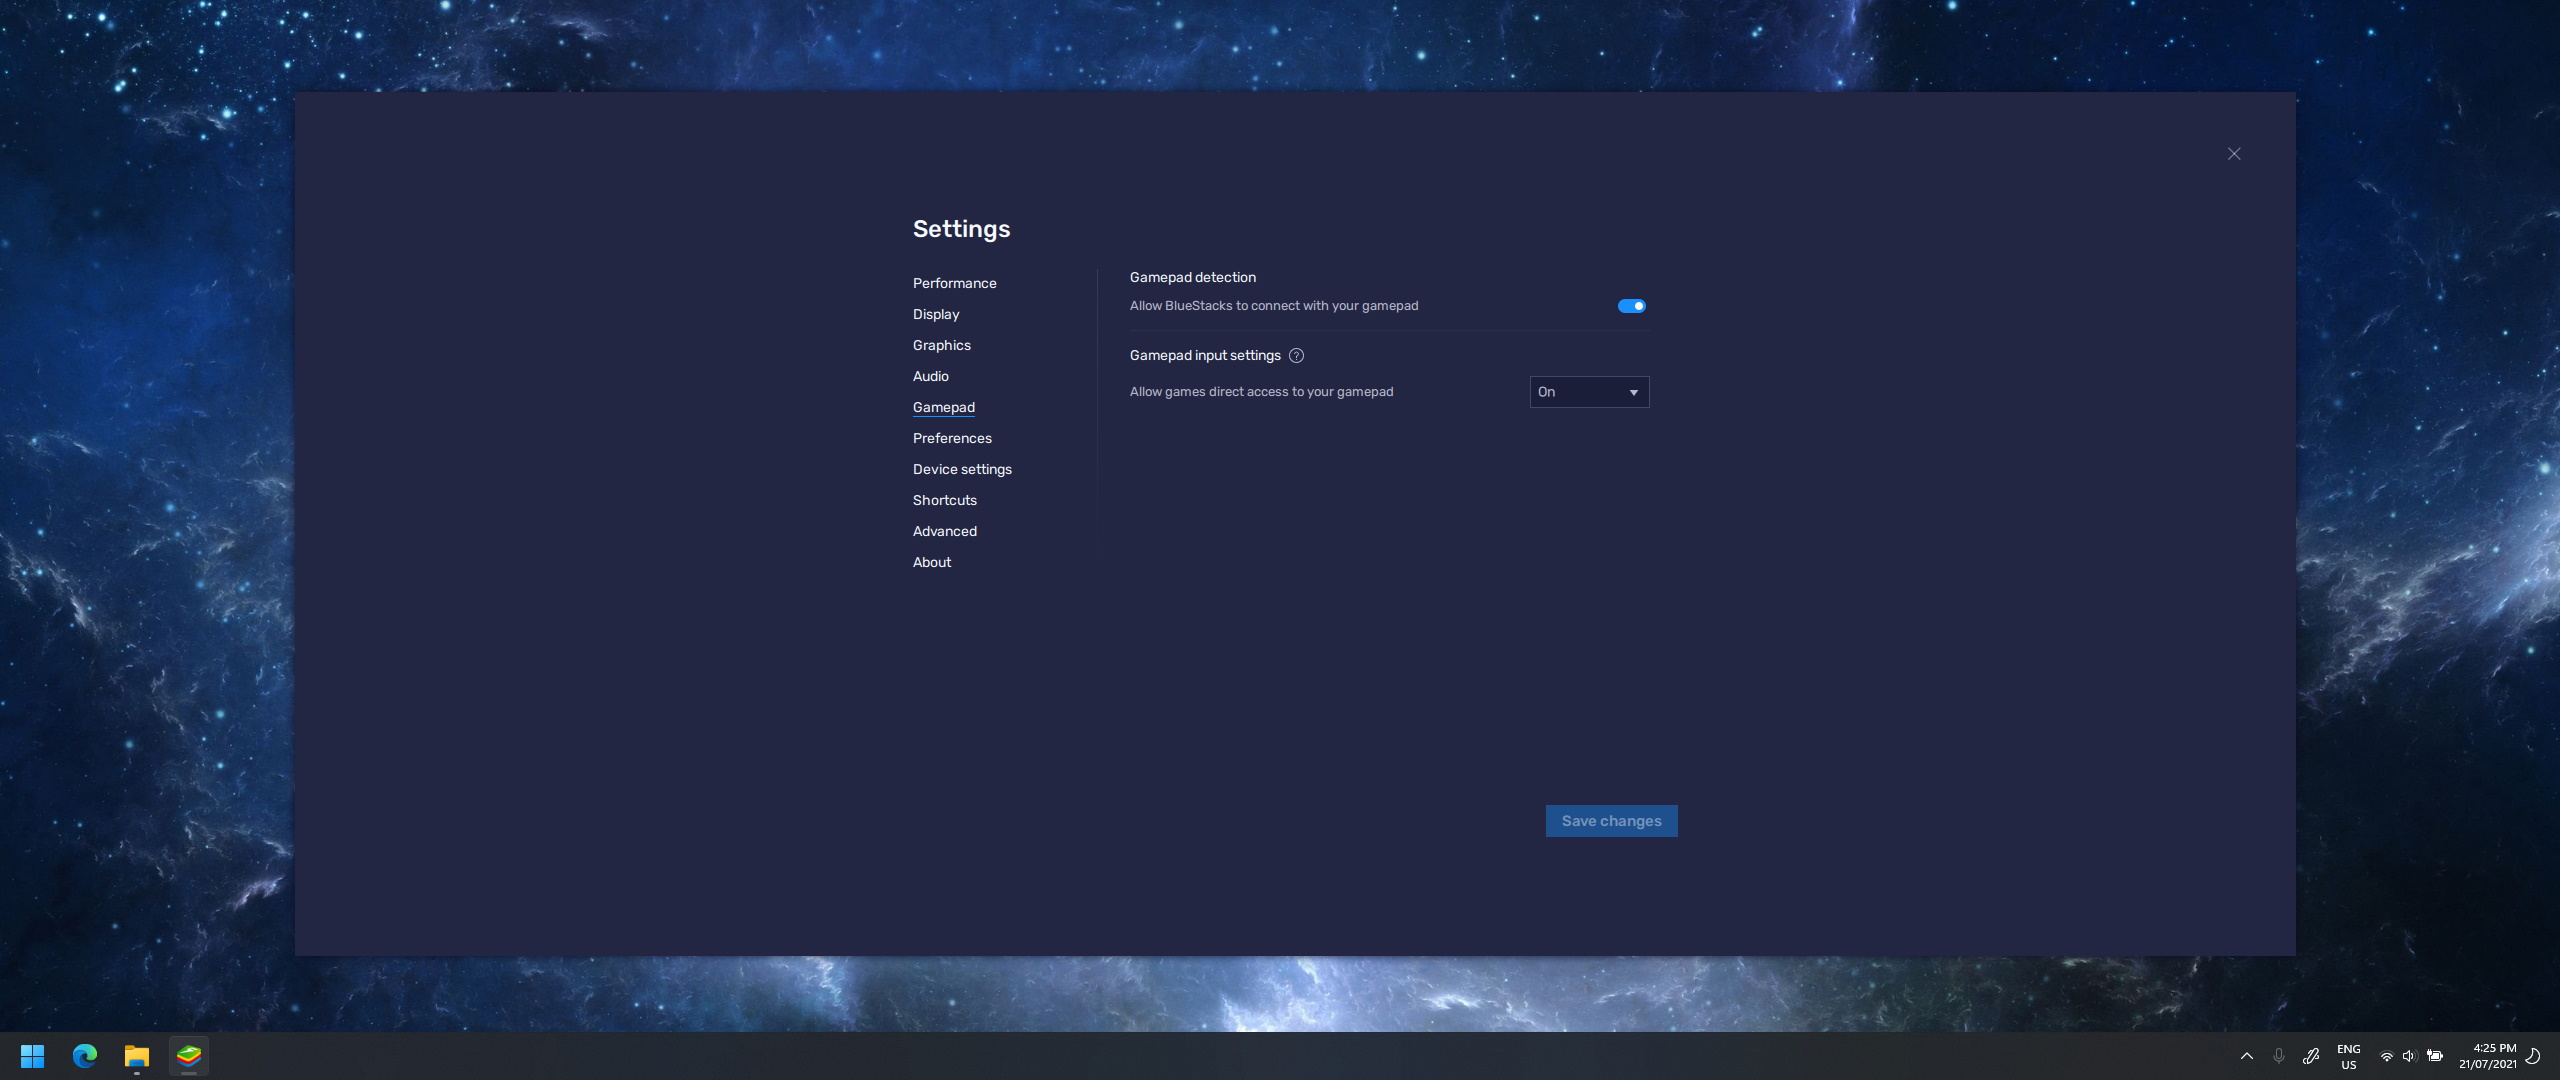
Gamepad
- Gamepad detection: On
- Allow games direct access to your gamepad: On
Without this, you cannot play with a controller, and since Bluestacks doesn't seem to support multi-touch, a controller is a requirement to play the game on PC. Of course, you could technically setup keyboard bindings through Bluestacks for it, but considering the importance of a precise direction of the joystick, this isn't going to be worth trying.
With these settings done like this, your pages should now look like this:
Step 3: Download the Game
By clicking here, you can download the files required for this tutorial. It also comes with a Bluestacks installation file, but this was for Bluestacks 4 as this same file was used in my older video tutorial. The link will take you to a Google Drive shared file for you to install. I would have created a button to download directly off this website, but the bandwidth costs would be expensive for me so I decided it would be best if I use Google Drive so it is free for me to share.
Once rlss.zip has finished installing, you need to the right click it and select Extract all. This will create a new folder with all the files you need.
Now, on the desktop of your Bluestacks instance, there should be a folder called System Apps. Click on it, and open Media Manager. In the bottom-left of this app, press the button Import from Windows. Navigate your way to the extracted files, and import rlss.apks (the game) and apkmirror.apk (the installer). Once uploaded, click on apkmirror.apk to install the app. Once installed, click Open.
Step 4: Install the Game
From in the APKMirror app, follow these steps to install the game:
- Click Browse Files.
- Go back a directory, then into DCIM, then SharedFolder.
- Wait a moment for rlss.apks to load, then click it.
- Click Install Package, then Watch ad and install app.
An advertisement will play, and then it will ask you to sign in to Google. This is for Google Play Services, since Bluestacks is basically just emulating an Android device on a computer. Sign in, and if it redirects you to the Play Store, just press the Recent Apps button on the top of the program, or type Ctrl+Shift+5. You will now be able to click Install app and the game will now be on your device! Just login to your Epic Games account and you'll be able to play the game.
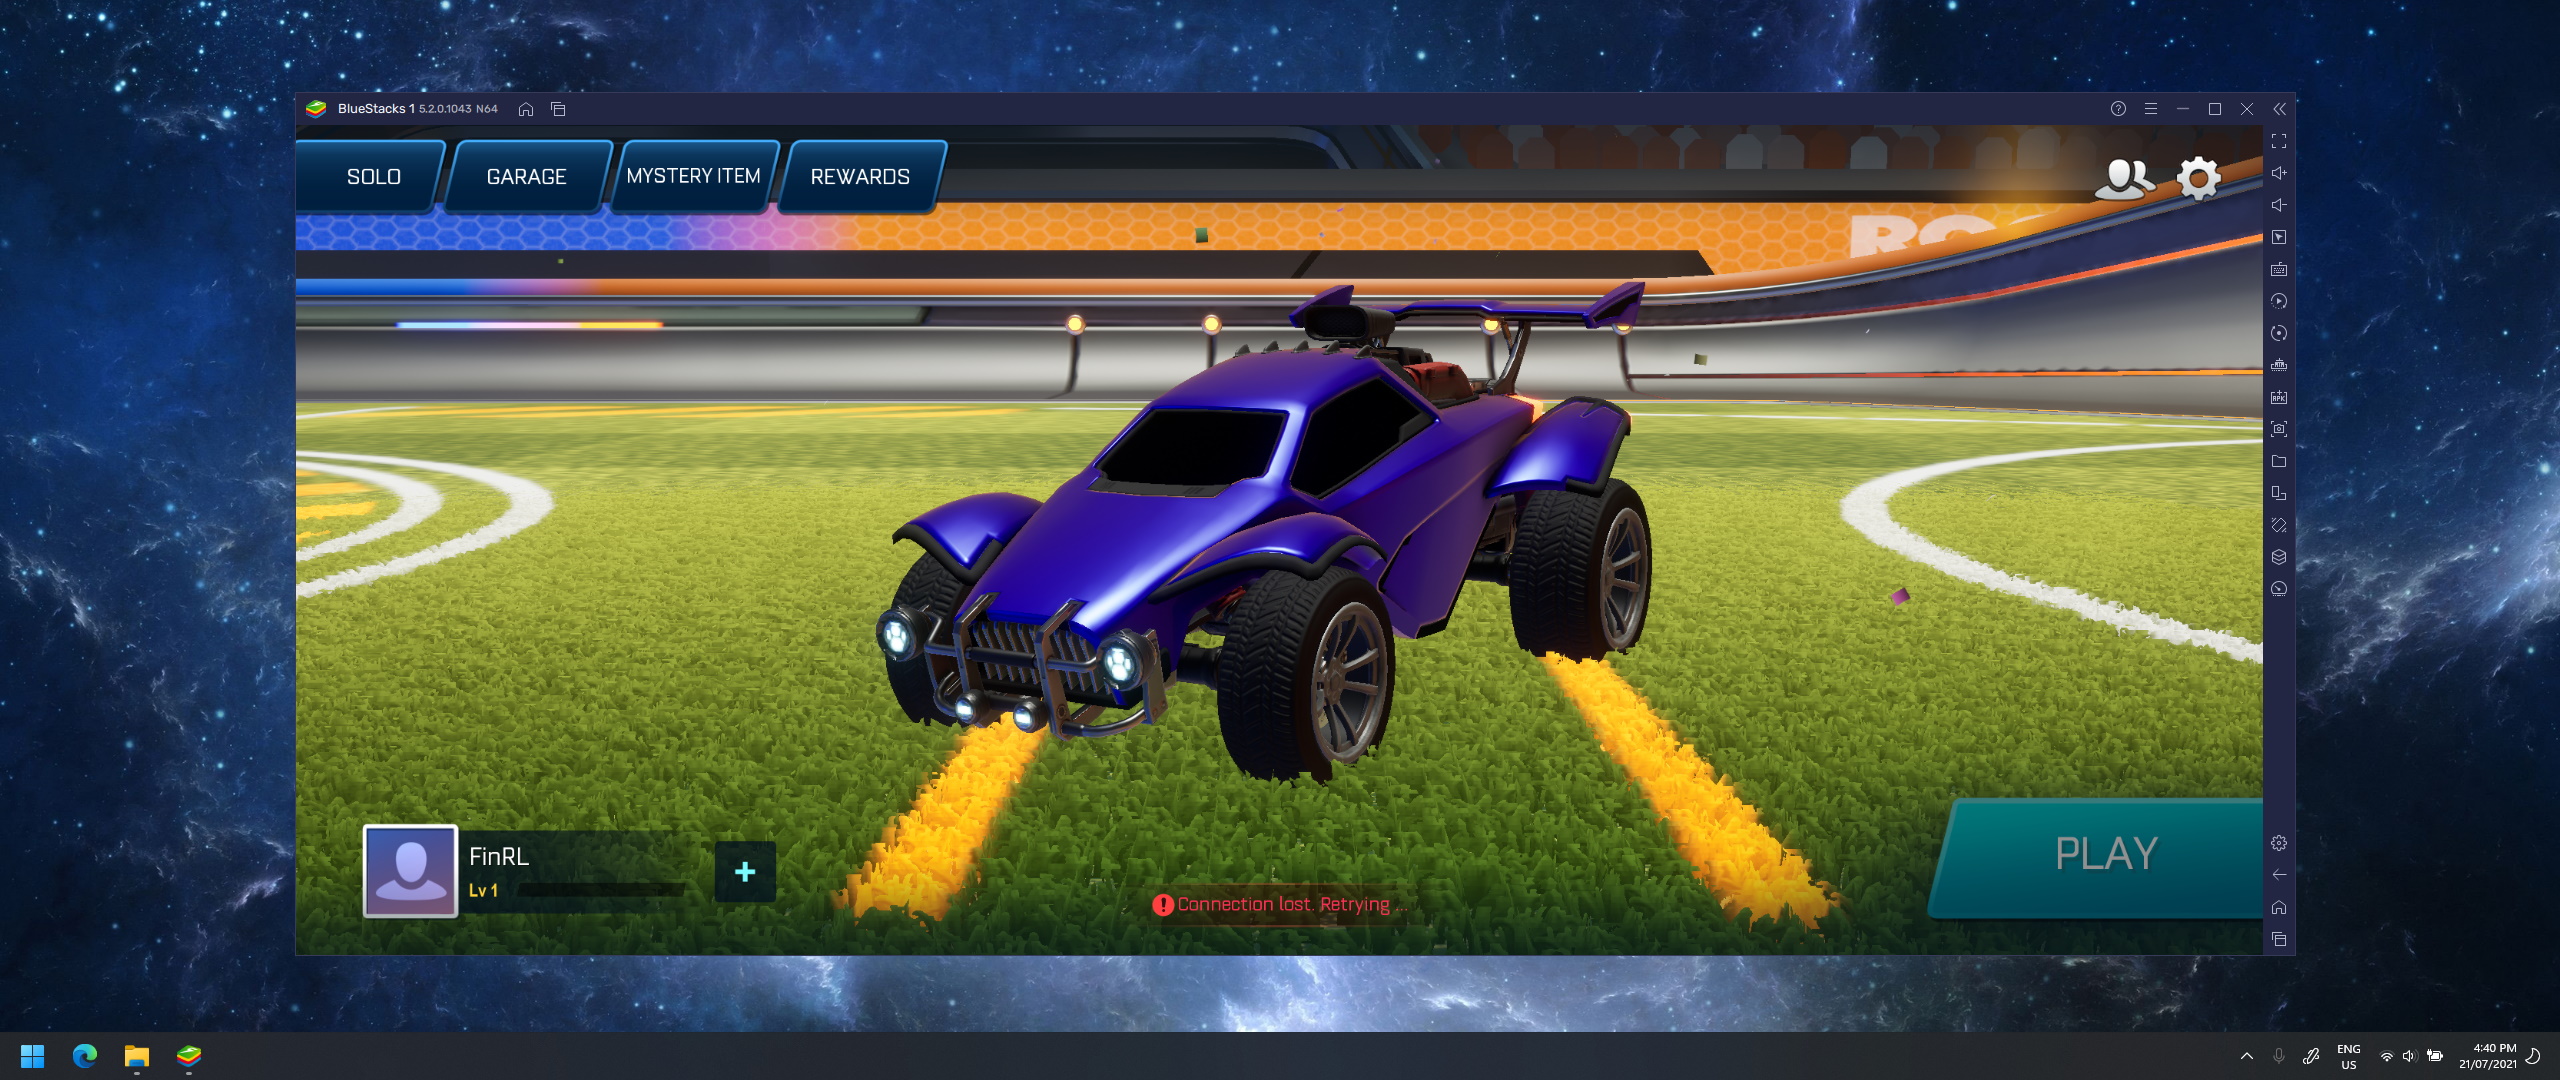
Assuming you followed everything correctly the game will now be working for you! Just plug in your preferred controller and enjoy! Bluestacks will have also created a shortcut on your desktop to the game so you can easily open it from there, however if you would prefer to launch from Steam, you can continue to follow this guide to set that up as well.
Step 5: Setup Steam Shortcut (optional)
To be able to launch RL Sideswipe directly from Steam, follow these steps:
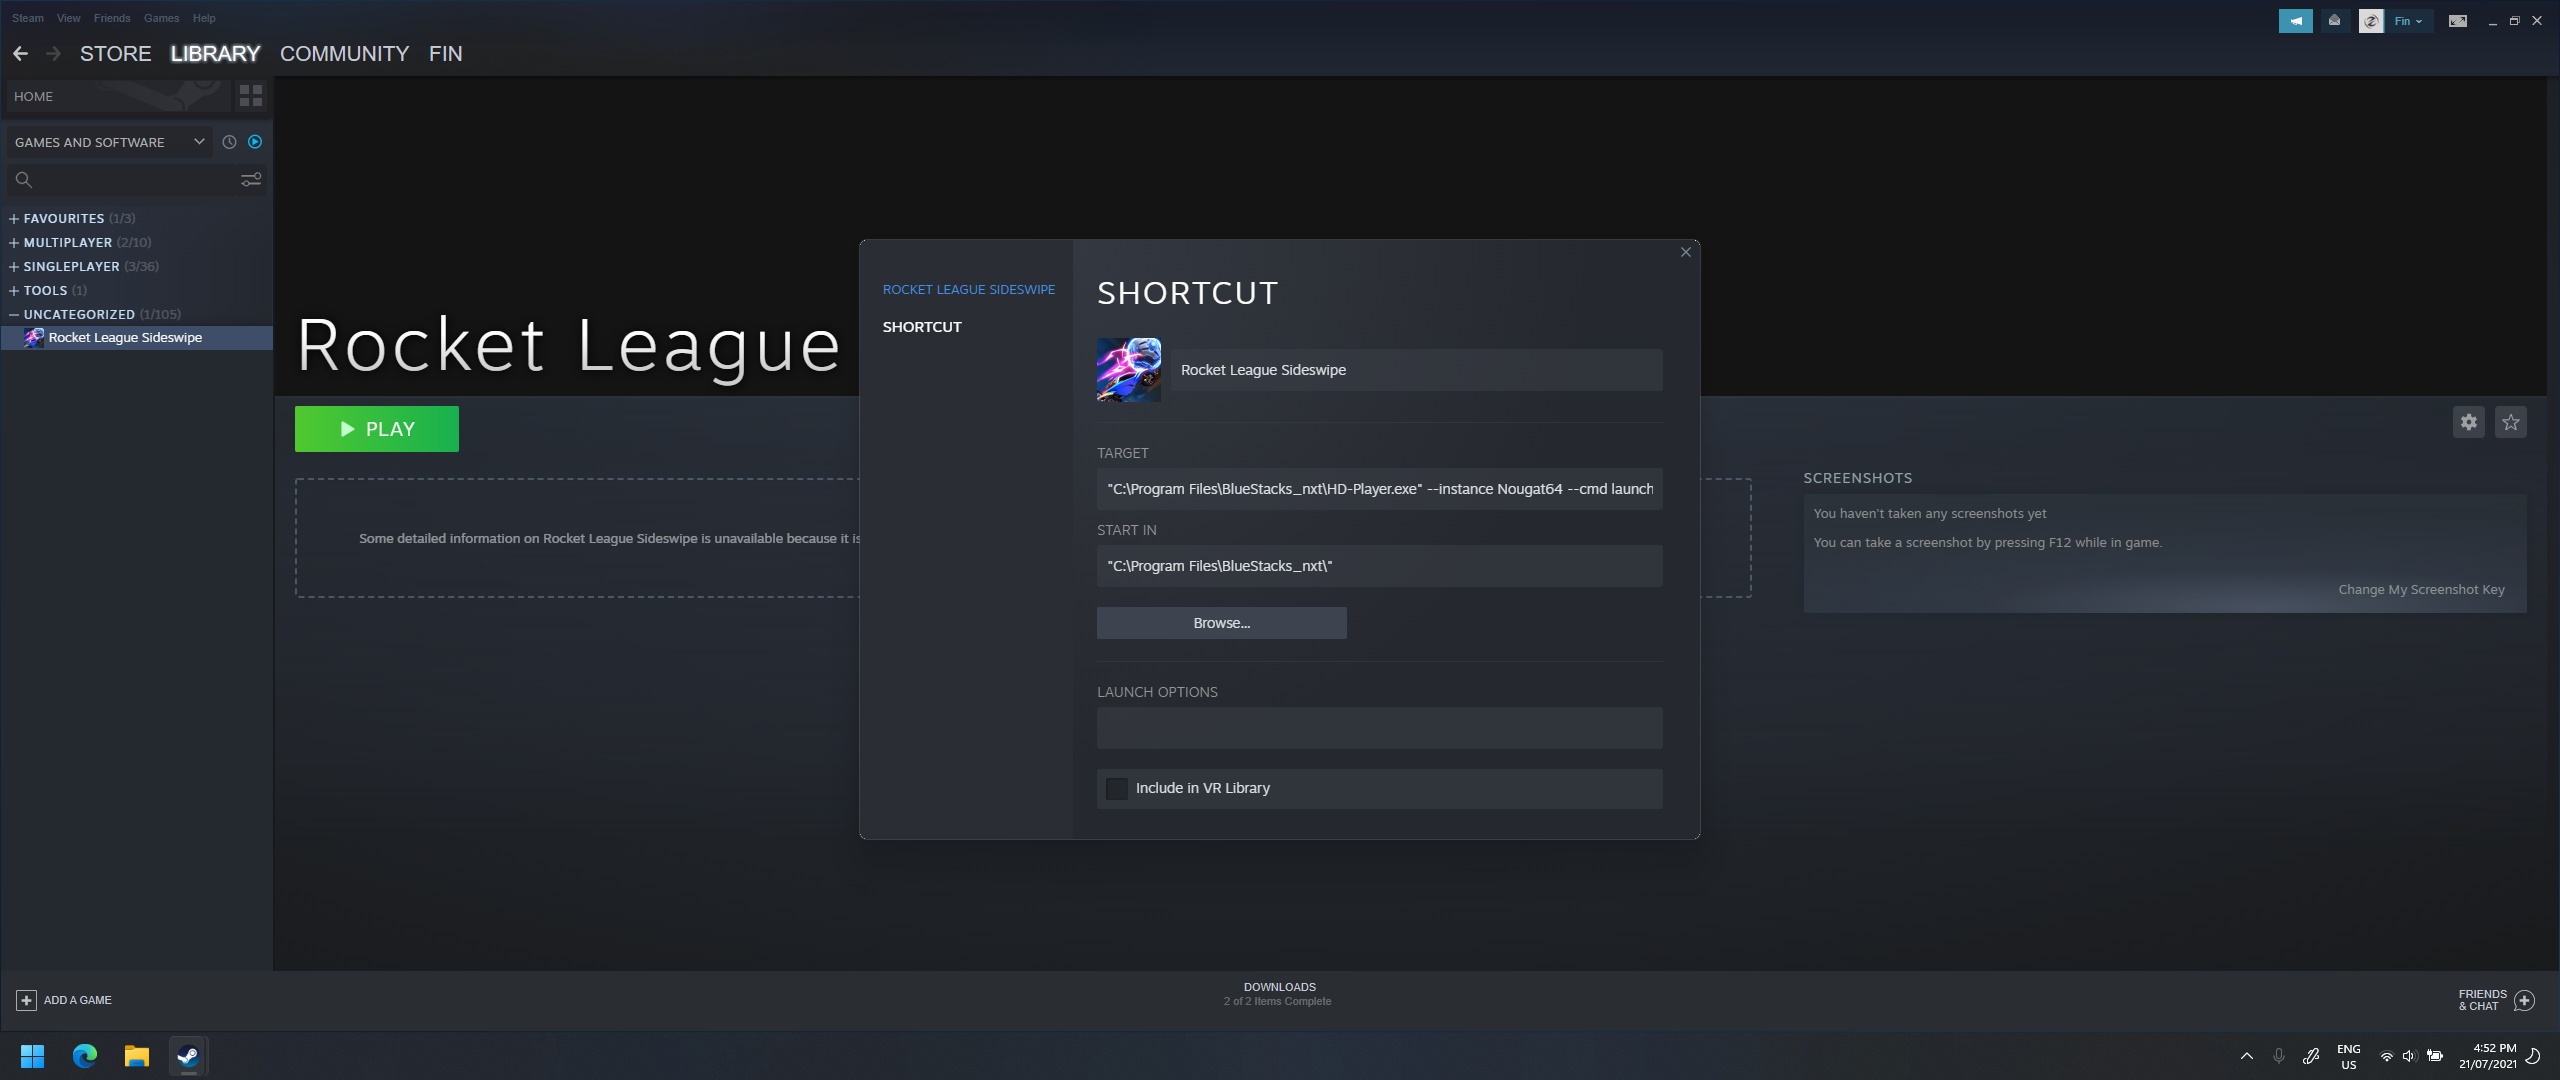
- In the bottom-left corner of Steam, click Add a game, then Add a non-Steam game. From here you can choose literally any app, since we will be changing its target in a moment.
- Open the Steam page for it, and click the settings icon and choose Preferences.
- From here, you can set the game to Rocket League Sideswipe, or anything you want really. Clicking on the icon will allow you to upload a custom icon as well, and the file logo.jpg in the extracted folder is what's used by the app itself.
- Go to your desktop, right click the shortcut Bluestacks created, and click Properties. From here, select the target value and copy it. Replace the target in the Steam shortcut with this.
Your shortcut settings should now look something like this…
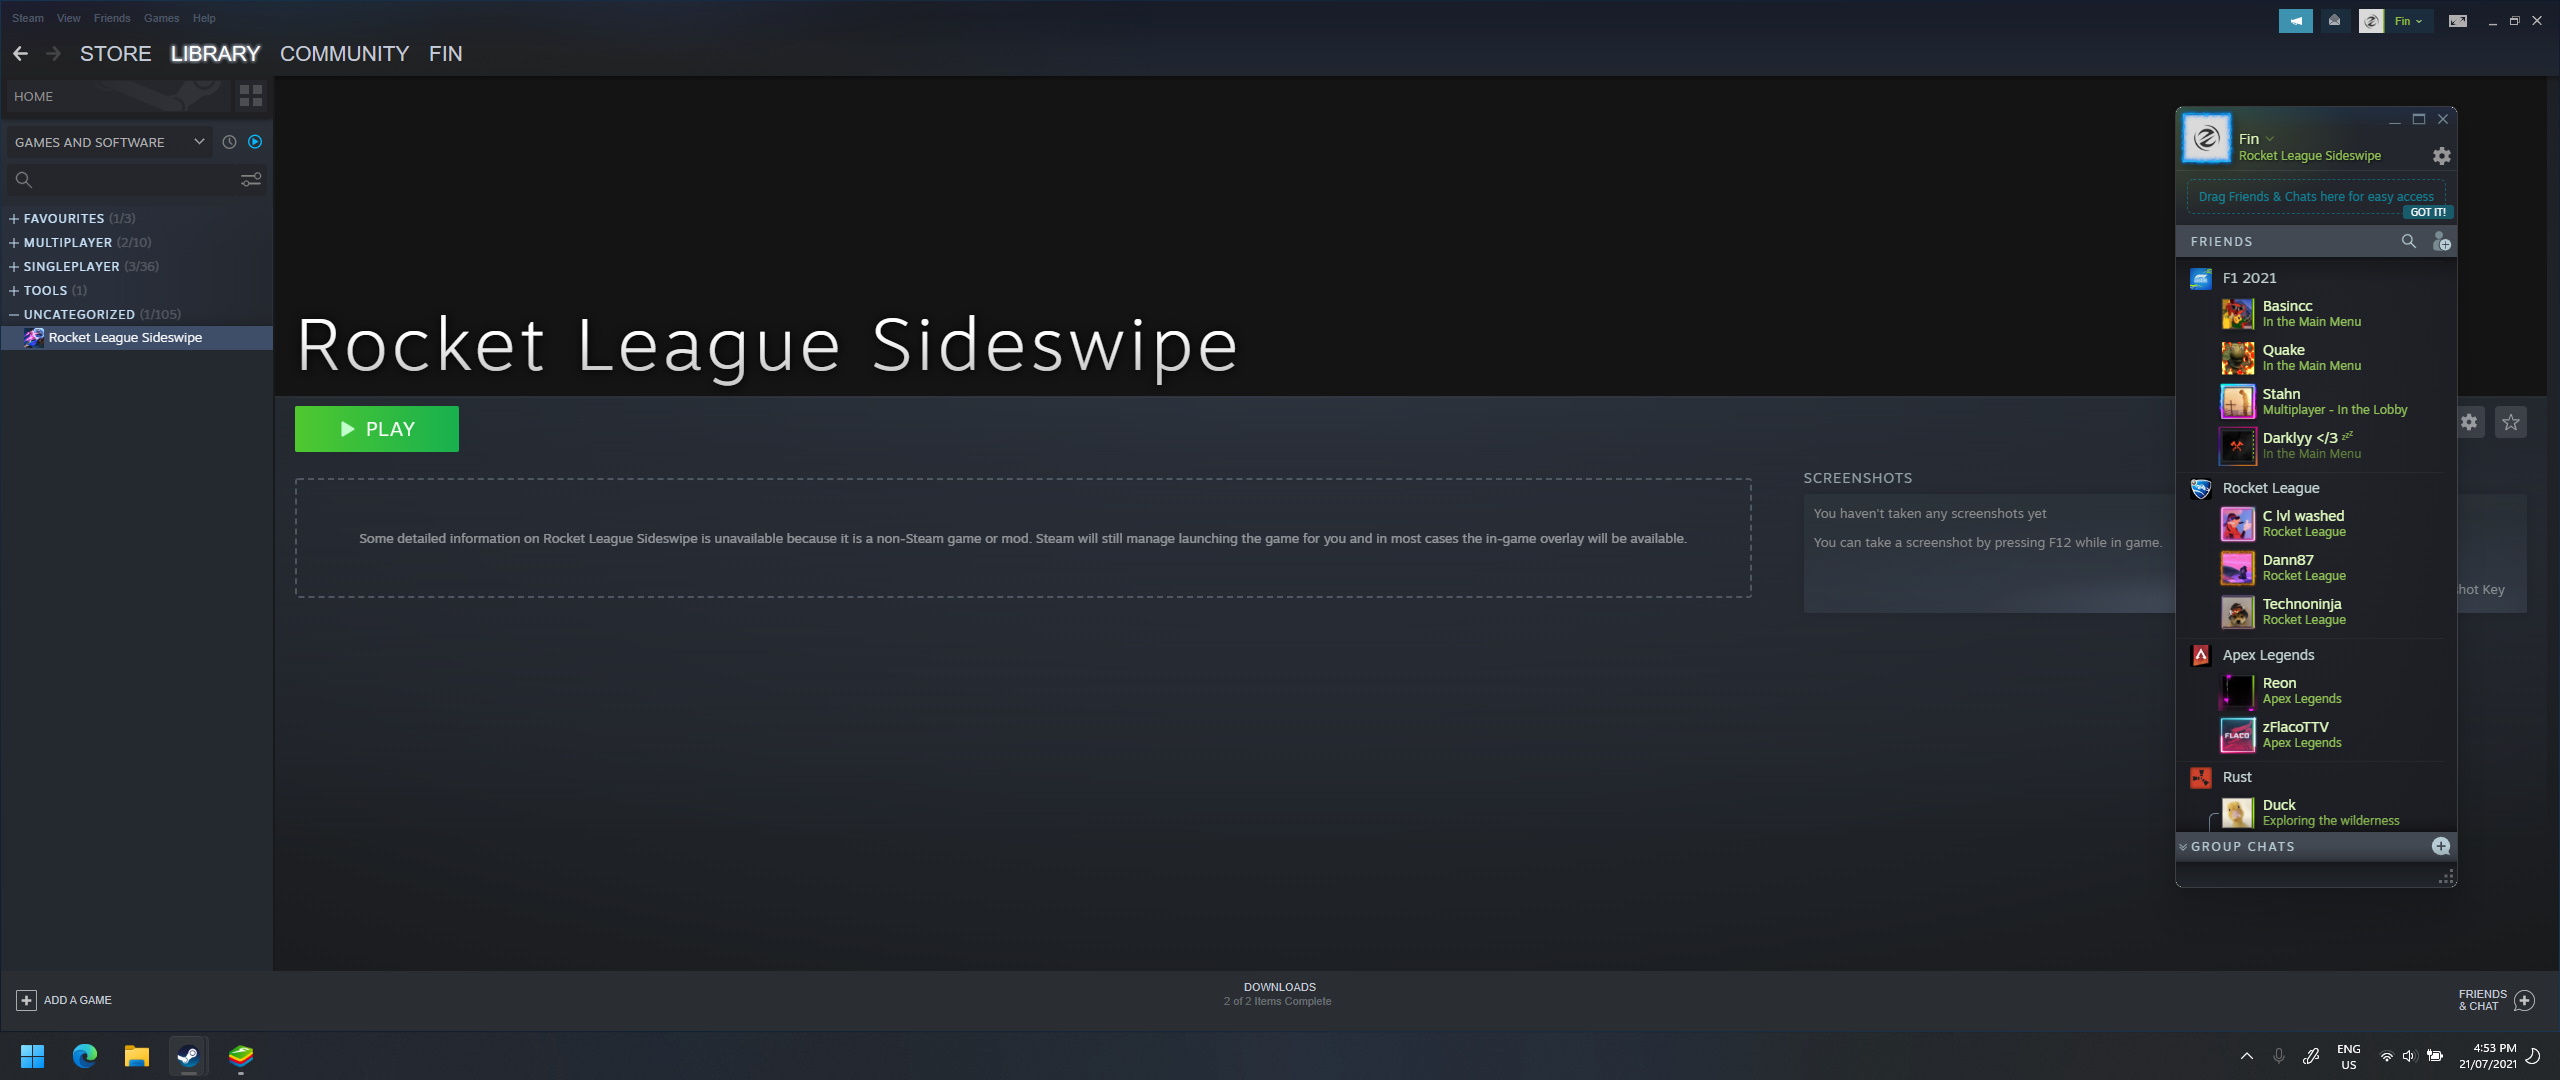
With this you should be able to launch the game from Steam as well. It even shows your friends that you are playing Rocket League Sideswipe (or whatever you named it) so I've had a few people DM me asking about it!
Thank you for reading my tutorial! If you have any questions or issues feel free to join and ask in my Discord server from the link below. I'll also be keeping it up to date with RL Sideswipe news so you won't miss any updates!
Follow along with our development journey on Discord!
There is sooo much to do, but we have big plans for RLSS.GG, and you can follow along in our server! Join now and you will receive a limited-time Early Access role which will transfer over to the website too!
Join Discord